👩🍳 Step-by-Step Instructions
Step 1: Mix Quark and Eggs
In a large mixing bowl, combine 200 g of quark or Greek yogurt with 3 eggs. This mixture forms the base of your protein bread, providing moisture and binding the ingredients together.
✅ Pro tip: Use a whisk or electric mixer on low speed to ensure a smooth, lump-free consistency. The quark or yogurt adds a subtle tang while keeping the bread soft and light.
Step 2: Add Salt and Baking Soda
To the egg and yogurt mixture, add 1 tsp of salt and 2 tsp of baking soda.
✅ Why it works: Baking soda reacts with the acidity of the yogurt to create lift, giving the bread a fluffy yet dense texture. Salt enhances all the flavors—don’t skip it!
⚠️ Note: If using apple cider vinegar (optional), add it now to boost the rising reaction.
Step 3: Incorporate Dry Ingredients
Add to the wet mixture:
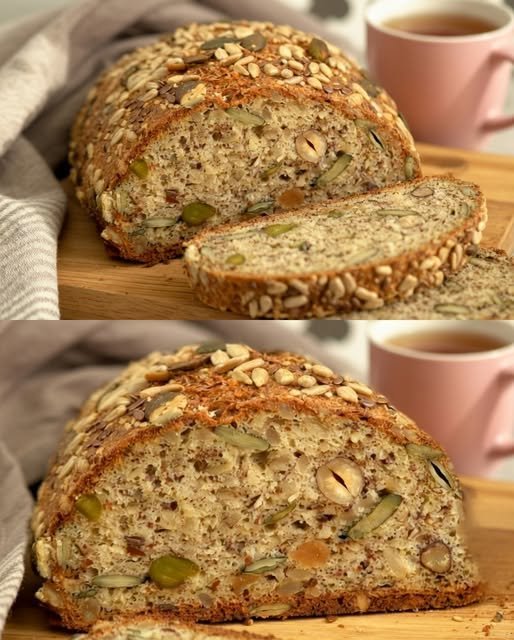
- 100 g ground almonds
- 100 g mixed seeds
- 80–120 g mixed nuts (chopped if large)
- 30 g ground linseed (flaxseed)
Stir well until evenly distributed. These ingredients provide:
- Texture and crunch from nuts and seeds
- Healthy fats for sustained energy
- Fiber and omega-3s for heart and gut health
Step 4: Add Psyllium Husks (The Secret Ingredient)
Gradually sprinkle in 16 g (2 tbsp) of psyllium husks while stirring continuously.
✅ Why psyllium matters: It absorbs moisture and creates a gel-like binding effect—essential for achieving a bread-like texture without gluten. It also adds significant soluble fiber, which supports digestion and satiety.
🔄 Stir thoroughly until the mixture thickens noticeably (about 1–2 minutes). It should hold together when pressed.
Step 5: Shape the Dough
Once thickened, shape the dough:
- By hand: Form into a free-form loaf on parchment paper (rustic style)
- In a pan: Press into a parchment-lined 9×5-inch loaf pan for uniform slices
✅ Pro tip: Wet your hands slightly to prevent sticking. For extra crunch and visual appeal, press additional seeds onto the top before baking.
Step 6: Prepare for Baking
- Line a baking sheet or loaf pan with parchment paper (not wax paper—it can stick).
- Transfer the shaped dough to the prepared pan.
- Smooth the top gently with a wet spatula if desired.
Step 7: Let It Rest (Don’t Skip!)
Allow the dough to rest for 20 minutes at room temperature.
✅ Why this matters: Psyllium needs time to fully hydrate. This step ensures the bread sets properly and achieves the ideal texture—moist inside, crispy outside.
🔥 While resting, preheat your oven to **180°C **(350°F).
Step 8: Bake to Golden Perfection
- Place in the preheated oven.
- Bake for 60 minutes with top and bottom heat (no fan/convection for best rise).
- The bread is done when:
- The top is deep golden brown
- It sounds hollow when tapped on the bottom
- A toothpick inserted in the center comes out clean
✅ Pro tip: If the top browns too quickly, tent loosely with foil after 40 minutes.
Step 9: Cool Completely (Patience Pays Off!)
Remove from the oven and let the bread cool completely on a wire rack—at least 1–2 hours—before slicing.
✅ Why cooling matters: Cutting while warm causes crumbling. As it cools, the structure sets, yielding clean, sturdy slices.
✅ Storage tip: Once cooled, wrap tightly in parchment + foil, or store in an airtight container.
📊 Nutritional Snapshot (Per Slice, ≈1/12 of loaf)
Estimates based on standard ingredients; values vary by specific nuts/seeds used.
|
Nutrient
|
Amount
|
|---|---|
|
Calories
|
180–220
|
|
Protein
|
15–20g
|
|
Total Fat
|
14–18g (mostly unsaturated)
|
|
Net Carbs
|
3–5g (total carbs minus fiber)
|
|
Fiber
|
6–9g
|
|
Sugar
|
1–2g (naturally occurring)
|
✅ Why these macros matter for weight management:
- High protein + high fiber = greater satiety, fewer cravings
- Low net carbs = stable blood sugar, reduced insulin spikes
- Healthy fats = sustained energy, hormone support
📝 Note: For precise tracking, calculate using your specific brands and measurements via an app like Cronometer or MyFitnessPal.
🍽️ How to Enjoy Your Protein Bread
This versatile loaf works for sweet or savory meals:
Breakfast Ideas
- Toasted with avocado, everything bagel seasoning, and a poached egg
- Spread with almond butter and sliced berries
- Topped with Greek yogurt, cinnamon, and a drizzle of sugar-free syrup
Lunch & Dinner
- Use as a base for open-faced sandwiches: turkey + cucumber + mustard
- Pair with soup or salad for a satisfying, low-carb meal
- Make “bread crumbs” by pulsing stale slices; use for coating chicken or fish
Snack Options
- Lightly toasted with cream cheese and smoked salmon
- Dipped in hummus or guacamole
- Cut into small cubes, toast with olive oil and herbs for savory croutons
🧊 Storage & Make-Ahead Tips
At Room Temperature
- Store in an airtight container or wrapped in parchment + foil
- Keeps for 3–4 days
Refrigerator
- Extend freshness to 7–10 days
- Ideal if your kitchen is warm or humid
Freezer (Best for Long-Term)
- Slice completely cooled bread first
- Wrap individual slices in parchment, then place in a freezer bag
- Freeze for up to 3 months
- Thaw at room temperature or toast directly from frozen
✅ Pro tip: Label with the date. Frozen slices toast beautifully—no thawing needed!
🔄 Substitutions & Variations
Dairy-Free
- Replace quark/Greek yogurt with unsweetened coconut yogurt or silken tofu blended until smooth
- Note: Texture may be slightly denser; add 1 tbsp extra psyllium if needed
Egg-Free (Vegan)
- Replace each egg with 1 tbsp ground flax + 3 tbsp water (let sit 5 mins to gel)
- Add ½ tsp extra baking soda + 1 tbsp apple cider vinegar for lift
- Result will be denser but still delicious
Nut-Free
- Omit nuts; increase seeds to 200 g total
- Use sunflower seed butter or tahini for added richness if desired
- Ensure all ingredients are processed in nut-free facilities if allergies are severe
Lower Calorie
- Use non-fat Greek yogurt
- Reduce nuts to 80 g; increase seeds for volume
- Note: Fat contributes to satiety—don’t reduce too much or you may feel less satisfied
Flavor Twists
|
Variation
|
Add-Ins
|
|---|---|
|
Everything Bagel
|
1 tbsp everything seasoning + 1 tsp garlic powder
|
|
Herb & Garlic
|
1 tbsp dried rosemary + 1 tsp onion powder + ½ tsp garlic powder
|
|
Cinnamon Swirl
|
Mix 1 tbsp cinnamon + 1–2 tbsp erythritol; swirl into batter before baking
|
|
Cheesy
|
Add 30 g grated Parmesan or nutritional yeast to dry ingredients
|
❓ FAQs: Your Protein Bread Questions, Answered
Q: Can I use almond meal instead of ground almonds?
A: Not recommended. Almond meal is coarser and contains more skin, which can make the bread gritty and affect texture. Use finely ground almond flour for best results.
A: Not recommended. Almond meal is coarser and contains more skin, which can make the bread gritty and affect texture. Use finely ground almond flour for best results.
Q: Why did my bread turn out dense or gummy?
A: Common causes:
A: Common causes:
- Psyllium wasn’t fully mixed or didn’t have time to hydrate (don’t skip the 20-min rest!)
- Oven temperature was too low (use an oven thermometer to verify)
- Bread was cut before fully cooling
- Too much moisture (reduce yogurt slightly next time)
Q: Can I make this in a bread machine?
A: This recipe relies on chemical leavening (baking soda + acid), not yeast, so most bread machine cycles won’t work well. Stick with oven baking for reliable results.
A: This recipe relies on chemical leavening (baking soda + acid), not yeast, so most bread machine cycles won’t work well. Stick with oven baking for reliable results.
Q: Is this bread keto-friendly?
A: Yes! With ≈3–5g net carbs per slice, it fits well within standard keto macros. Just account for the carbs from nuts/seeds in your daily total.
A: Yes! With ≈3–5g net carbs per slice, it fits well within standard keto macros. Just account for the carbs from nuts/seeds in your daily total.
Q: Can I skip the psyllium husks?
A: Not really. Psyllium is essential for binding and texture in gluten-free baking. Without it, the bread will likely crumble. If unavailable, ground flaxseed may work in a pinch, but results will differ.
A: Not really. Psyllium is essential for binding and texture in gluten-free baking. Without it, the bread will likely crumble. If unavailable, ground flaxseed may work in a pinch, but results will differ.
Q: Why does the bread smell slightly yeasty or sour?
A: This is normal! The reaction between baking soda and yogurt/quark can produce a mild fermented aroma. It doesn’t affect flavor or safety.
A: This is normal! The reaction between baking soda and yogurt/quark can produce a mild fermented aroma. It doesn’t affect flavor or safety.
Q: Can I use this bread for French toast or sandwiches?
A: Absolutely! It toasts beautifully and holds up well to toppings. For French toast, use slightly stale slices and a low-carb egg mixture.
A: Absolutely! It toasts beautifully and holds up well to toppings. For French toast, use slightly stale slices and a low-carb egg mixture.
⚠️ Important Considerations
✅ Allergies: This recipe contains eggs, dairy (if using yogurt/quark), tree nuts, and seeds. Always check labels and substitute as needed for your safety.
✅ Portion awareness: While nutritious, this bread is calorie-dense due to nuts and seeds. Enjoy 1–2 slices as part of a balanced meal—not the whole loaf in one sitting.
✅ Hydration: Psyllium absorbs significant water. Drink plenty of fluids throughout the day to support digestion.
✅ Not a magic solution: This bread can support weight management as part of an overall healthy lifestyle—but sustainable results come from consistency, not single foods.
✅ Consult a professional: If you have medical conditions (kidney disease, diabetes, IBS, etc.), discuss dietary changes with your healthcare provider or a registered dietitian.
💙 A Compassionate Reminder
If you’re exploring this recipe as part of a weight loss journey, please be kind to yourself.
🌱 Progress isn’t linear. Some days will feel easier than others—and that’s normal.
🌱 Food is more than fuel. Enjoy the crunch, the aroma, the satisfaction of making something nourishing with your own hands.
🌱 Your worth isn’t tied to a number on a scale. You deserve care, respect, and joy—regardless of where you are in your journey.
🌱 Food is more than fuel. Enjoy the crunch, the aroma, the satisfaction of making something nourishing with your own hands.
🌱 Your worth isn’t tied to a number on a scale. You deserve care, respect, and joy—regardless of where you are in your journey.
This bread is a tool, not a test. Use it if it helps. Skip it if it doesn’t. Either way, you’re worthy exactly as you are.
🧭 The Bottom Line
This crispy, protein-packed bread is a delicious, versatile addition to a balanced, health-supportive lifestyle.
Remember: 🥜 High protein + high fiber = greater satiety and stable energy
🌾 Naturally gluten-free and low in refined carbs
🔁 Customizable to your taste, allergies, and goals
⏳ Patience pays off: rest the dough, cool completely, store properly
💙 Sustainable wellness comes from consistency—not perfection
🌾 Naturally gluten-free and low in refined carbs
🔁 Customizable to your taste, allergies, and goals
⏳ Patience pays off: rest the dough, cool completely, store properly
💙 Sustainable wellness comes from consistency—not perfection
Whether you’re managing weight, exploring low-carb eating, or simply craving a wholesome homemade bread, this recipe delivers flavor, nutrition, and satisfaction—without compromise.
So preheat that oven, gather your seeds, and get ready to enjoy a slice of crispy, protein-rich goodness. Your taste buds—and your goals—will thank you.
For Complete Cooking STEPS Please Head On Over To Next Page Or Open button (>)